WWPass Security Pack User Guide
CHAPTER 1 – WHAT IS WWPASS SECURITY PACK?
WWPass Security Pack is a client side software pack that is installed on notebook, desktop or terminal server systems. It provides WWPass Key functionality for web browsers, VPN and mail clients, and encrypted file systems.
WWPass Security Pack Compatibility
Operating Systems:
- Microsoft Windows 7, 8.1, 10 (32-bit and 64-bit)
- macOS High Sierra 10.13, macOS Sierra 10.12, OS X El Capitan 10.11
- Ubuntu 16.04 Xenial Xerus, Ubuntu 17.10 Artful Aardvark, Debian 8 Jessie and Debian 9 Stretch
Web Browsers:
- Internet Explorer
- Firefox
- Safari
- Chrome
Mail clients:
- Microsoft Outlook
- Mozilla Thunderbird
Installation on Windows and macOS machines
To install WWPass Security Pack on a desktop computer you should have administrative rights.
To install WWPass Security Pack, use your browser to navigate to https://ks.wwpass.com/download/. The site automatically identifies your desktop operating system and highlights the appropriate download. Press the Download button. When the download completes, run the installer. On Windows machines Security Pack requires a computer reboot to finish installation.
CHAPTER 2 – DASHBOARD
WWPass Dashboard is an application that provides an interface for users to manage certificates, view key status, and launch WWPass programs and configurations and get access to information about using WWPass Keys with other software packages.
Dashboard is launched automatically by the operating system on computer start up. Dashboard displays the WWPass icon in the system tray. The icon image reflects the connection status of WWPass Keys and smart card readers:
![]() — The Key icon is blue when your WWPass Key is connected to your computer.
— The Key icon is blue when your WWPass Key is connected to your computer.
![]() — The Key icon is yellow when a smart card reader is available but a WWPass Key is not connected to your computer.
— The Key icon is yellow when a smart card reader is available but a WWPass Key is not connected to your computer.
![]() — The Key icon is gray when your WWPass Key or smart reader is not connected to your computer.
— The Key icon is gray when your WWPass Key or smart reader is not connected to your computer.
![]() — The Key icon is red when the smart card subsystem is not running.
— The Key icon is red when the smart card subsystem is not running.
![]() — The Key icon is shown with an exclamation point when a new version of the WWPass Security Pack is available.
— The Key icon is shown with an exclamation point when a new version of the WWPass Security Pack is available.
The computer needs to be restarted after installation or after an update of the WWPass Security Pack. A restart enables all features of the Security Pack.
Dashboard Main Window
A left mouse click on the dashboard tray icon opens the main Dashboard window. The window contains four tabs: Solutions, Certificates, Key Status and Advanced.
WWPass Solutions Tab
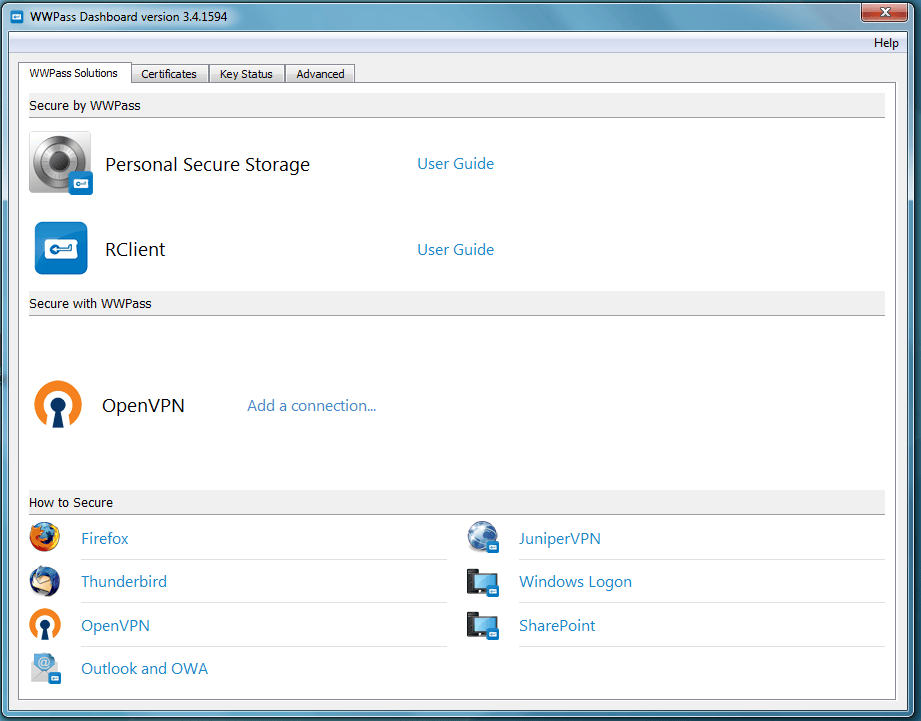
Personal Secure Storage
PSS allows you to store confidential files in your personal vault in the WWPass cloud. Your data is encrypted, fragmented and dispersed in WWPass data centers around the globe so that it cannot be stolen. Only you can access files stored in PSS using your WWPass Key.

Click on PSS icon to start the application. You will be requested to connect your WWPass Key (if not connected) and provide a PIN. To open PSS documentation, follow the User Guide link shown in Dashboard.
RClient
We are no longer supporting WWPass RClient (RADIUS Client).
If you are interested in WWPass authentication for software that does not support WWPass out of the box, such as VMware Horizon View Client, Fortinet FortiGate and OpenVPN, please contact us.
RClient (RADIUS client) is a self-descriptive name: indeed it is a client part of WWPass RADIUS solution. RClient provides native WWPass authentications to applications and hardware devices which support RADIUS protocol for user login. RClient is installed on user desktop and is included into Security Pack. At present it supports VMware Horizon View Client, Fortinet FortiGate and OpenVPN, and contains built-in configuration profiles for these applications.
More applications may be supported in future or on request.

Click on RClient icon to start the application. To open RClient documentation, follow the User Guide link shown in Dashboard.
OpenVPN
OpenVPN is free open source VPN client/server software. It is one of the most used VPN solutions in the world. OpenVPN supports user-side Certificate authentication. Creating configuration files for a VPN connection can be a difficult task, especially when PKCS#11 smart cards are involved.
The WWPass helper solution (available for Windows and Linux) allows you to properly configure a VPN connection, substituting the correct PKCS#11 library path and pointing to suitable certificate associated with a WWPass KeySet. The “Add a connection” link creates a new configuration for OpenVPN. Detailed instructions may be found on wwpass.com.

Adding new OpenVPN connection
Follow the steps below to configure the OpenVPN client for authentication with your WWPass Key. These steps create a configuration file that is associated with your WWPass Key and OpenVPN certificate.
Before you begin
- Ask your system administrator for a personal certificate for OpenVPN and associate it with your WWPass KeySet. If the certificate is available in as P12 or PFX file, you can use the Dashboard certificate import functionality.
- Also obtain a Certificate Authority certificate for OpenVPN: create a "certs" folder within your OpenVPN folder and save the Certificate Authority certificate in the "certs" folder.
To configure the OpenVPN client
-
Connect your WWPass Key to your computer.
-
Click Dashboard's WWPass Solutions tab.
-
Click Add a connection in the OpenVPN in the Secure with WWPass group.
-
In the WWPass Security for OpenVPN window, enter or select configuration settings as follows:
- Configuration Name: Enter the name to use for the OpenVPN configuration file.
- Address: Enter the hostname of your VPN server, for example, "openvpn.mycompany.com".
- Port: Enter the port used by the OpenVPN client to communicate with the server if this is different from the official port (1194). The official port number is the default value.
- Certificate Authority: Select the Certificate Authority certificate for OpenVPN. Click the “Browse” button
 and select the certificate file in the Select File window. Click
  button.
 - Personal Certificate: Select your personal certificate for OpenVPN. First, click the down arrow on “Personal certificate” control. Then click on your certificate in the list of certificates added to your WWPass Key.

-
Click
 in the WWPass Security for OpenVPN window. When the OpenVPN Configuration window displays the contents of the configuration file, click
  to save the file in the location shown at the top of the window. On Linux, also specify a name for the file. On Windows, the name entered in Configuration Name is automatically used as the file name.
How to Secure
The “How to Secure” group on the Solutions tab provides you with links to Help Document on using WWPass with third-party software programs:
- Firefox
- Thunderbird
- Outlook and OWA
- OpenVPN
- JuniperVPN
- Windows Logon
- Sharepoint
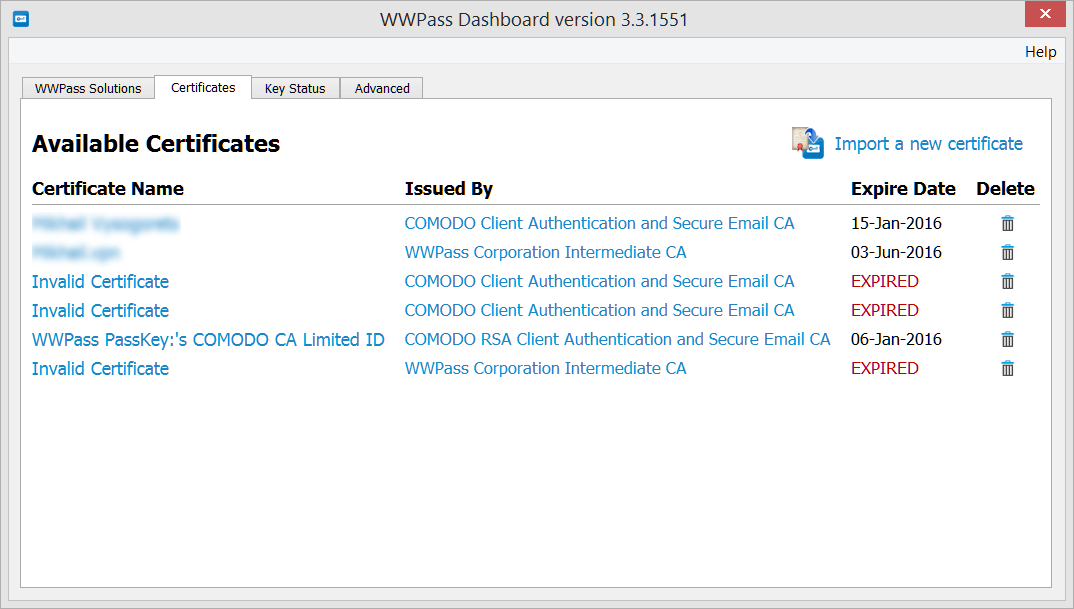
Certificates Tab
The certificates tab is WWPass’ certificate manager. It allows a user to view, import and delete X.509 certificates controlled by a WWPass KeySet.
X.509 certificates prove your identity when you use your WWPass Key to authenticate within a domain, application, service, or website. They may be used to exchange secure mail and access encrypted file systems.
Once a certificate is added to your KeySet, it is encrypted by the WWPass Key and stored in WWPass’ cloud storage, where it is encrypted again, fragmented, and dispersed. There is no single point of vulnerability from which it could be stolen.
Each certificate specifies its owner and certifies that the public key included in the certificate belongs to the certificate owner. The public key is part of a public/private key pair that lets you use digital signing and encryption to securely and privately exchange data over a network or the Internet:
- The public key is distributed freely and is published as part of a certificate. You can share it with others so that they can check your digital signature and the key to encrypt the email and data they send you.
- The private key corresponds to the public key but is kept secret and is only accessible by its owner. It is used to decrypt email and data that were encrypted with your public key. Data encrypted with a public key can only be decrypted with the corresponding private key.
Only Firefox and Internet Explorer web browsers support certificate installation directly on a smart card (WWPass KeySet). Use FF or IE when obtaining mail certificates on a Comodo web site. Internet Explorer is the only browser which installs certificates from the Windows Server PKI service directly onto a KeySet.
All certificates available on a user’s KeySet are listed on the Certificates tab. The following information is shown for each certificate:
- Certificate Name - a certificate's common name. It might be your name or a long alpha-numeric text string.
- Issued By - the Certificate Authority (CA) that issued a certificate.
- Expire Date - the date a certificate will expire.
To view additional information about a certificate, click its name in the Certificates tab. The Certificate Details window opens. From Certificate Details, you can open a Window’s system dialog with detailed information on the certificate ![]() .
.

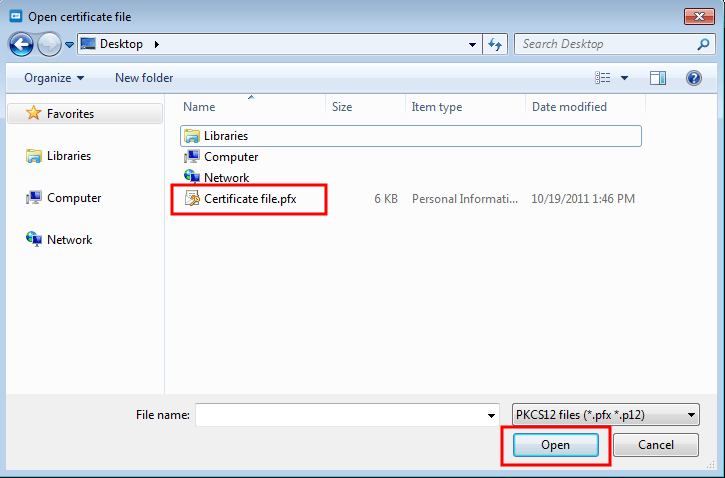
Import a certificate from a file
Certificates may be stored (along with their private keys) in files of type PFX or P12. In most cases, the certificate file is encrypted with a password. Be sure you know this password. To import a certificate to a KeySet, do the following:
-
Connect a WWPass Key to your computer
-
On the Dashboard Certificates tab, click Import a new certificate

-
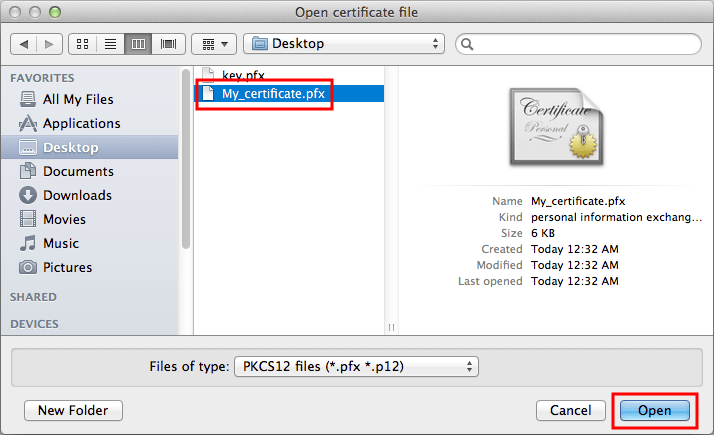
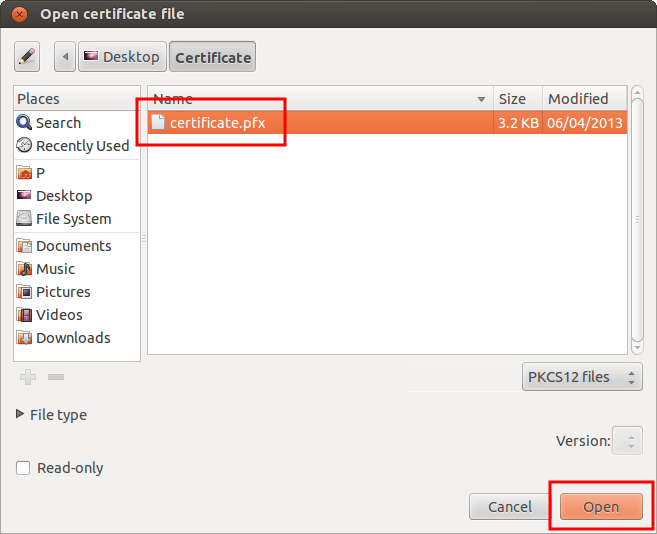
In the Open Certificate File dialog, locate the certificate file on your computer. It might have a .pfx or .p12 extension. Select the file and click
Open Certificate File dialog on Windows:
Open Certificate File dialog on Mac:
Open Certificate File dialog on Linux:
-
If prompted for the password used to encrypt the certificate file, enter the password and click
.

The certificate is imported and shown in Dashboard's Certificate tab. At this point, the certificate is securely stored in WWPass cloud storage, where it is encrypted, fragmented, and dispersed.
It is highly recommended to delete the certificate file (PFX or P12) from the computer when it has been added to your KeySet.
Certificate expiration date
One of the major problems when using certificates is their limited lifetime. You should check the certificate expiration date frequently.
The Expire Date column in the Certificates tab helps to detect problems in advance
- If a certificate is not due to expire soon, its expiration date is shown in black.
- If a certificate is due to expire in one month or less, its expiration date is shown in red.
- If a certificate has expired, the word "EXPIRED" replaces the expiration date and "Invalid Certificate" replaces the name in the Certificate Name column.

Prior to its expiration date, a certificate must be renewed or a new certificate for the same purpose must be obtained and associated with your WWPass KeySet.
Not every expired certificate should be deleted. Certificates used to decrypt data (such as email messages) should be preserved even if they are expired. Without those certificates, it will be impossible to read these messages. To the contrary, expired certificates used for authentication purposes (Windows logon or VPN access, for example) are unusable and should be deleted.
Delete a certificate
- Connect your WWPass Key to your computer.
- Click Dashboard's Certificates tab. Certificate information is retrieved.
- Click the Delete icon
 at the end of the certificate’s row.
 - When a message asks if you are sure you want to delete certificate, click .
- When prompted, enter the PIN for your WWPass Key and click . The certificate is deleted. The delete process might take some time.
Key Status Tab
The Key Status tab shows the information about WWPass Keys – WWPass Key or Service Key.
-
Key Type — this is either WWPass Key or Service Key.
-
Key Name — this is the name you specified when you activated the Key in Key Services. Internal Technical Information might be needed for advanced troubleshooting when you contact the WWPass Service Desk. It consists of:
-
GetInfoStatus — this is a status code returned by the WWPass Key’s Smart Card. WWPass Keys use Smart Card technology.
-
Smart Card ATR — this is the Smart Card ATR (Answer to Reset) output for a WWPass Key. ATR conveys information about communication parameters and state for a Smart Card following electrical reset of its chip by a Smart Card reader. The presence of an ATR is one indication that the card is operative. The ATR string identifies who made or issued a WWPass Keys Smart Card.

To get Key status
- Connect a WWPass Key or Service Key to your computer.
- Click Dashboard's Key Status tab.
If a Key is not connected before you click the tab, "No Key present" is shown. Connect a Key to your computer. Then click ![]() at the top of the tab.
at the top of the tab.
- Click
 in the message that asks to allow authentication into Key Services. Key information is retrieved and displayed in the Status tab.
 - If you want to check status for another Key, disconnect the Key currently presented. Information on that Key is cleared from the tab and "No Key present" is shown.
- Connect the other Key to your computer. Then click
 at the top of the Key Status tab.
 - Click in the message that asks to allow authentication into Key Services. Key information is retrieved and displayed in the Status tab.
Status Reference Chart
| Status | What It Means | What To Do |
|---|---|---|
| Blank WWPass Key | Shown for a WWPass Key that has not been activated. | Activate your KeySet from WWPass Key Services: https://ks.wwpass.com/ |
| Blank Service Key | Shown for a Service Key that has not been activated. | Activate your KeySet from WWPass Key Services: https://ks.wwpass.com/ |
| Key has an internal error | Shown when a problem has occurred with a Key's software or hardware. | Please contact info@wwpass.com for assistance. |
| Key is active and operating normally | Shown when there are no problems with a Key. | Use your Key as normal. |
| Key is blank | Shown when a Key has not been configured as a WWPass Key or Service Key. | Activate your KeySet from WWPass Key Services: https://ks.wwpass.com/ |
| Key is not initialized | Shown when a Key has not been configured as a WWPass Key or Service Key. | Activate your KeySet from WWPass Key Services: https://ks.wwpass.com/ |
| Key is not initialized properly | Shown when something went wrong during Key activation. | Please contact info@wwpass.com for assistance. |
| Key is disabled | Shown when a Key was disabled from Key Services. You can disable a Key if it was lost or stolen. | If the Key is found, you can activate it from WWPass Key Services: https://ks.wwpass.com/ |
| No Key present | A WWPass Key or Service Key is not connected to your computer. | Connect your WWPass Key or Service Key to your computer by placing it on or near your NFC reader/inserting it into a USB port. Then click Refresh to obtain the Key's status. |
| Unknown device detected | Shown when a device other than a WWPass Key is connected to your computer. Examples of other devices include smart cards for public transportation and mobile phones. | Connect your WWPass Key or Service Key to your computer by placing it on or near your NFC reader/inserting it into a USB port. Then click Refresh to obtain the Key's status. |
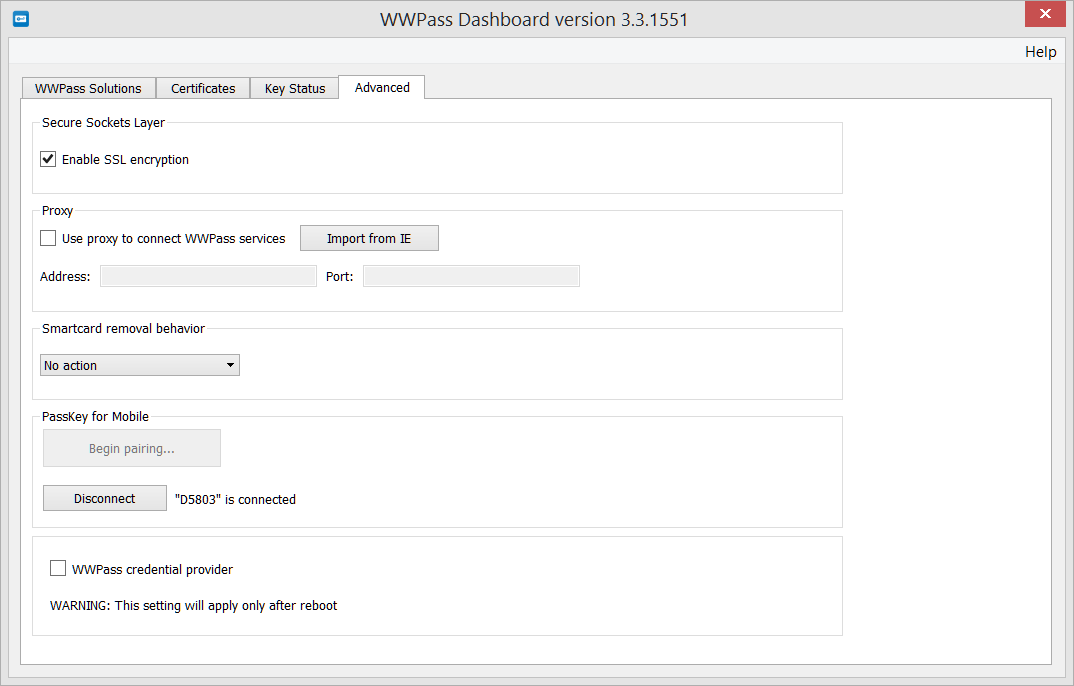
Advanced Tab
The Advanced tab provides settings that let you:
- Control the use of SSL encryption for communication between a WWPass Keys and the WWPass core network.
- Set up an HTTP proxy configuration for communication between a WWPass Keys and the WWPass core network
- Set up system behavior when a WWPass Key is disconnected from a Windows computer
- Enable or disable the WWPass Credential provider for Windows OS
Using the Enable SSL Encryption Feature
By default, the HTTPS protocol is used for all communication between your WWPass Key and WWPass services. You can control whether the HTTPS or HTTP protocol is used for certain parts of this communication using the Enable SSL encryption feature. It is highly recommended to keep SSL encryption enabled.
To use the SSL encryption feature
Set the Enable SSL encryption checkbox as follows:
 Check the checkbox when your system prevents use of the HTTP protocol. The HTTPS protocol and SSL encryption will be used for all communication between your WWPass Key and WWPass. (The checkbox is checked by default).
 Clear the checkbox when your system allows use of the HTTP protocol and you want to speed up communication between your WWPass Key and WWPass. HTTPS is used only for communication that requires the security of SSL encryption. HTTP is used for all other communication.
Setting up HTTP Proxy
The Use proxy to connect WWPass services feature lets you control whether your WWPass Key communicates with WWPass Services over the Internet via an HTTP proxy server.

Internet connections are made through a proxy server primarily at organizations and companies. Typically, people connecting to the Internet from home do not use a proxy server.
To use the HTTP proxy feature
- Set the Use proxy to connect to WWPass services checkbox as follows:
 Check the checkbox if you want Internet connections between your WWPass Key and WWPass to be made through an HTTP proxy server.
![]() Clear the checkbox if you do not use a HTTP proxy server for Internet connections. You do not need to perform remaining steps. (The checkbox is not selected by default.)
Clear the checkbox if you do not use a HTTP proxy server for Internet connections. You do not need to perform remaining steps. (The checkbox is not selected by default.)
- In the Address box, enter the address of the proxy server, for example: proxy.example.net
- In the Port box, enter the number of the port used for HTTP connections, for example: 80
Internet Explorer may be configured to auto-detect http proxy in proper environment. This case click ![]() button to get proxy settings. If a proxy configuration is not available, the "No active proxy configuration found" message appears.
button to get proxy settings. If a proxy configuration is not available, the "No active proxy configuration found" message appears.
Smart Card Removal Behavior
The Smartcard removal behavior lets you control what happens when you disconnect your WWPass Key after using it to log into a Windows Active Directory domain. You can choose to disconnect from a remote session or automatically log out of Windows, or remain logged into Windows when your WWPass Key is disconnected.
Microsoft Windows provides a native solution to handle card removal behavior. It works best for smart card authentication on local computers, but often fails on Remote Desktop/Terminal Servers. Due to time delays this native setting may cause false card removal detection and involuntary session interrupts.
WWPass solves this problem with an improved card presence detection algorithm. If you experience problems with the Microsoft native service, switch to WWPass removal behavior control.
Disconnecting remote session and logging out are the most secure behaviors in a work setting when you plan to leave your computer unattended.

To use the Smartcard removal feature
Select from the list under Smartcard removal behavior:
- No Action - Select this if nothing should happen when you disconnect your WWPass Key from your Windows computer. You will remain logged into Windows.
- Disconnect - Select this to automatically disconnect from a session on a remote computer when you detach your WWPass Key from your Windows computer. Your current Windows session is preserved. You can resume the session using the Ctrl+Alt+Delete keys.
- Force logoff - Select this to automatically log out of Windows when you disconnect your WWPass Key. Your current Windows session is closed. To log on again, you need to connect your WWPass Key to your computer and enter your PIN.
Using the WWPass Credential Provider Feature
Credential providers are Windows operating system components which authenticate users of the computer. Two types of credential providers are already included in Windows: login with password and smart card. Smart card logon should be used for strong user authentication. It is especially important when accessing Remote Desktops or Terminal Servers.
Sometimes users may experience difficulties when using the native Windows smart card credential provider. In case there are more than one authentication certificates (for different domains for example), Windows may automatically choose an incorrect certificate. Alternatively a user may be presented with long list of available certificates with the same name.
The WWPass credential provider automatically selects the correct certificate corresponding to particular computer domain.
You need administrator rights on your computer in order to change the credential provider.

The WWPass Credential provider results in an increase in authentication time.
The two Credential Providers that are available are described below:
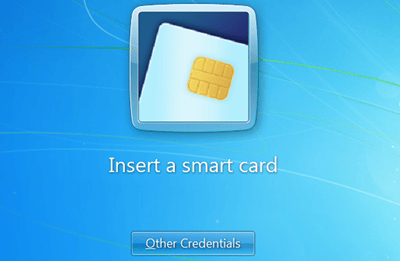
-
Windows Smart Card Credential Provider - this is the native Windows credential provider. When the WWPass Credential provider is switched off (by default), the Windows smart card credential provider is active. When you press Ctrl + Alt + Delete to log into Windows, the “Insert a Smart Card” tile appears.
-
WWPass Credential Provider - this is WWPass provider which is turned off by default. When it is turned on and you press Ctrl + Alt + Delete to log into Windows, the WWPass Logon tile appears.

To use the WWPass credential provider feature
- Set the WWPass credential provider checkbox as follows:
 Select the checkbox if you want to use the WWPass Credential Provider. (The checkbox is selected by default.)
 Clear the checkbox if you want to use the Windows Smart Card Credential Provider for remote login.
If you are logged in as a user without administrative rights for the computer, you are prompted to log in as an administrator. If you cannot log in as an administrator, you cannot change the Credential Provider. Ask a system administrator to do this for you.
- Restart your computer to put the setting into effect.
Security Pack Update
In order to update Security Pack on any platform you should have administrative rights.
Updating WWPass Security Pack updates all of its components, including the Dashboard. On Windows and Mac, the Security Pack can be updated from Dashboard. Alternatively you can always get latest version from the WWPass download page: https://ks.wwpass.com/download/
Ubuntu Linux OS
Provided the instructions on https://ks.wwpass.com/download/ were followed, the Security Pack is updated the same way as all other packages. A user is notified of availability of newer packages via update managers. Alternatively, you can install all available updates, using the commands
$ sudo apt-get update
$ sudo apt-get upgrade
Microsoft Windows
When a new version of WWPass Security Pack is available, the Dashboard tray icon shows red exclamation point ![]() .
.
To update Security pack, follow the steps below:
-
Click the
 icon key with a red exclamation point in the system tray. Click
  to confirm installation of a new Security Pack version, click
  to postpone installation.
 -
Click
in the message that tells you Dashboard will be closed in order to install the update. The WWPass Security Pack Installer opens. -
From the “Welcome” screen, click
 to begin updating the WWPass Security Pack.
 -
From the “Important Information” screen, note text about restarting your computer after the update is complete. Then click
. -
From the “Standard Install” screen, click Install to begin updating the Security Pack. Then click Continue Installation in the message that asks if you’re sure you want to install the software now. Finally, enter your password and click Install Software.
-
From the "installation was completed successfully" screen, click Restart to restart your computer and enable all features of the Security Pack. You can then start Dashboard.
Mac OS X
Follow the steps below to update the WWPass Security Pack on a Mac from the WWPass Dashboard. You must have administrator rights for your computer.
- Click the icon key with a red exclamation point in the system tray. Click to confirm installation of a new Security Pack version, click to postpone installation.
- Click in the message that tells you Dashboard will be closed in order to install the update. The WWPass Security Pack Installer opens.
- From the “Welcome” screen, click Continue to begin updating the WWPass Security Pack.
- From the “Important Information” screen, note text about restarting your computer after the update is complete. Then click Continue.
- From the “Standard Install” screen, click Install to begin updating the Security Pack. Then click Continue Installation in the message that asks if you’re sure you want to install the software now. Finally, enter your password and click Install Software.
- From the "installation was completed successfully" screen, click Restart to restart your computer and enable all features of the Security Pack. You can then start Dashboard.
CHAPTER 3 – USING SECURITY PACK
Dashboard is the main component of Security Pack. Other components (drivers, plugins) are controlled by respective applications – browsers, mailers etc. – and reveal themselves only through notification messages in host applications.
Firefox automatic configuration
Firefox is an open source, cross-platform Web browser. It is widely used all over the world. One of its unique features is cross-platform smart card support based on PKCS#11 standard.
Starting from Security Pack version 3.0, Dashboard automatically configures Firefox when installed. The following components are added
- Firefox browser plugin for WWPass Web authentication is installed (the plugin complies with NP-API specification)
- WWPass PKCS#11 (cryptoki) smart card support is added to the list of available modules. It allows Firefox to install certificates on WWPass KeySets from public Certificate Authorities sites (e.g. Comodo). Another supported feature – user-side certificate authentication to various network resources.
APPENDIX 1 – WHAT IS IN WWPASS SECURITY PACK?
Mozilla Thunderbird is an open source and cross platform mail client. Same as Firefox, it supports PKCS#11 specification for smart cards. This feature allows Thunderbird users to exchange encrypted messages and sign outgoing mail. Thunderbird complies with S/MIME specification.
Starting from Security Pack version 3.0, Dashboard automatically configures Thunderbird when installed. Particularly WWPass PKCS#11 (cryptoki) smart card support is added to the list of available modules.
Components of WWPass Security Pack
Web browser extension modules for WWPass authentication on WWPass enabled web sites
- NP-API plugin for Firefox and Safari
- Native messaging extension for Chrome
- Active X control for Internet Explorer
Support for Certificate-based applications
WWPass Security Pack comes with standard compliant smart card support:
- PKCS#11 module
- Microsoft Smart Card mini-driver
WWPass Dashboard
Dashboard is a control application which provides detailed status of WWPass hardware and software components. Running in the system tray, it detects the presence of WWPass Keys and the status of smart card subsystem as well as indicating the availability of upgrades.
The certificate management tab of the Dashboard provides full control over certificates associated with a WWPass KeySet. Other functions of the Dashboard allow a user to check on the type of WWPass Key and its status.
RClient
RClient is a desktop application which works with WWPass RADIUS server and provides user access to OpenVPN, Fortigate VPN and VMware View servers.
Personal Secure Storage
PSS provides every WWPass KeySet owner with free access to personal, highly encrypted file storage.