Getting Started With WWPass Cisco VPN
This document describes how to configure WWPass as an Cisco AnyConnect identity provider to protect your VPN connections.
Introduction
WWPass provides VPN powered by WWPass’s strong MFA and data encryption technology. This guide will walk you through the steps needed to start using WWPass VPN.
WWPass VPN consists of four entities:
- Gluu integrated with WWPass Genuine Authentication module
- R.A.D.I.U.S server with WWPass 'checknonce' module
- WWPass Easy VPN deb package
- Cisco ASA 5505 and newer
Prerequisites
Requirements:
- HTTPS certificate for Cisco ASA with Common Name (CN) asa.example.com in SubjectName or DNS Name asa.example.com in SubjectAltName;
- HTTPS certificate for VPN WEB portal with Common Name (CN) connect.example.com in SubjectName or DNS Name connect.example.com in SubjectAltName;
- HTTPS certificate for Gluu IAM server with Common Name (CN) iam.example.com in SubjectName or DNS Name iam.example.com in SubjectAltName;
- HTTPS certificate for VPN connection diagnostics with Common Name (CN) probe.example.com in SubjectName or DNS Name probe.example.com in SubjectAltName;
- WWPass Service Provider certificate.
This documentation is described for the following assumed prerequisites with example IP addresses:
- Office Network address 192.168.1.0/24
- Gluu+WWPass+RADIUS+easyvpn server IP address 192.168.1.29
- Cisco ASA inside interface IP address 192.168.1.10
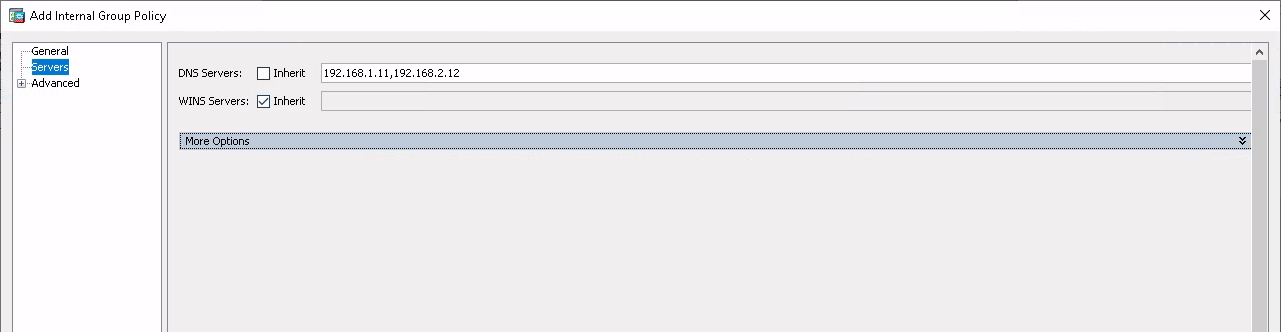
- Office DNS servers’ IP addresses 192.168.1.11, 192.168.1.12
- VPN client dinamic IP address pool 10.10.10.100-10.10.10.200
Gluu integrated with WWPass Genuine Authentication module
Gluu integrated with WWPass Genuine Authentication module installation and configuration instruction available here: https://github.com/wwpass/gluu/blob/master/INSTALLATION.md
Access to VPN WEB portal
It may be done on a separate machine or the same as Gluu+WWPass EasyVPN server with separate IP Addresses. In this documentation it’s assumed it is a separate virtual machine server with nginx installed.
- Deploy a virtual machine with any Linux;
- Install nginx server;
- Create 3 virtual hosts:
- connect.example.com – for VPN WEB portal reverse proxying;
- iam.example.com – for Gluu+WWPass Auth module + WWPass Easyvpn proxying;
- probe.example.com – for VPN connection diagnostics;
- connect.example.com virtual host minimal configuration:
server {
        listen 80;
        server_name connect.example.com;

        location / {
                rewrite ^(.*)$ https://connect.example.com$1;
        }
}
server {
        listen 443 ssl;
        server_name connect.example.com;
        ssl_certificate connect.example.com.crt;
        ssl_certificate_key connect.example.com.key;
        add_header Strict-Transport-Security "max-age=31536000;";

        access_log /var/log/nginx/connect-access.log;
        error_log /var/log/nginx/connect-error.log;

        location /newuser {
                proxy_pass http://192.168.1.29:9062;
                include webapp.conf;
        }

        location / {
                error_page 404 =200 @fallback;
                proxy_pass http://192.168.1.29:9061;
                include webapp.conf;
        }

        location @fallback {
                rewrite /(.*) / redirect;
                proxy_pass http://192.168.1.29:9061;
                include webapp.conf;
        }
}
- webapp.conf content:
proxy_headers_hash_max_size 640;
proxy_headers_hash_bucket_size 128;
proxy_pass_header Server;
proxy_set_header Host $http_host;
proxy_set_header X-Real-IP $remote_addr;
proxy_set_header X-Forwarded-For $remote_addr;
proxy_set_header X-Forwarded-Host $server_name;
proxy_set_header X-Scheme $scheme;
proxy_redirect off;
proxy_intercept_errors on;
- iam.example.com virtual host minimal configuration:
server {
        listen 80;
        server_name  iam.example.com;

        location / {
                rewrite ^(.*)$ https://iam.example.com$1;
        }
}

server {
        listen 443 ssl;
        server_name iam.example.com;

        include ssl.conf;
        ssl_certificate iam.example.com.crt;
        ssl_certificate_key iam.example.com.key;

        access_log /var/log/nginx/iam-access.log;
        error_log /var/log/nginx/iam-error.log;

        large_client_header_buffers 4 64k;

        location /oxauth {
                proxy_pass https://iam.example.com/oxauth;
                include proxy.conf;
        }
        location /identity {
                proxy_pass https://iam.example.com/identity;
                include proxy.conf;
        }
        location /cas {
                proxy_pass https://iam.example.com/cas;
                include proxy.conf;
        }
        location /passport {
                proxy_pass https://iam.example.com/passport;
                include proxy.conf;
        }
        location /wwpass {
                proxy_pass https://iam.example.com/wwpass;
                include proxy.conf;
        }
        location / {
                proxy_pass https://iam.example.com;
                include proxy.conf;
        }
}
NOTE: DNS name iam.example.com should be resolved to 192.168.1.29 IP address (Gluu+WWPass Easyvpn server) on this machine.
- proxy.conf content:
proxy_redirect off;
proxy_next_upstream error timeout invalid_header http_500;
proxy_connect_timeout 2;
proxy_set_header Host iam.example.com;
proxy_set_header X-Real-IP $remote_addr;
proxy_set_header X-Forwarded-For $proxy_add_x_forwarded_for;
- probe.example.com virtual host minimal configuration:
server {
        listen 80;
        server_name probe.example.com;

        location / {
                rewrite ^(.*)$ https://probe.example.com$1;
        }
        access_log /var/log/nginx/probe-access.log;
        #error_log /var/log/nginx/probe-error.log; # this log file is tend to grow drastically, so we comment it out. Uncomment it for debug only.
}

server {
        listen 443 ssl;
        server_name probe.example.com;

        ssl_certificate probe.example.com.crt;
        ssl_certificate_key probe.example.com.key;
        add_header Strict-Transport-Security "max-age=31536000;" always;
        add_header Access-Control-Allow-Origin https://connect.example.com always;
        access_log /var/log/nginx/probe-access.log;
        #error_log /var/log/nginx/probe-error.log; # See comment above

        location = /probe/probe-officeaccess.html {
                root /var/www/html/;
                allow 10.10.10.0/24; # Allow access this file for VPN clients only
                deny all;
        }
}
- Create empty file
/var/www/html/probe/probe-officeaccess.html;
- Also, you may put just OK string there.
R.A.D.I.U.S server with WWPass 'checknonce' module
R.A.D.I.U.S server with WWPass 'checknonce' module installation and configuration:
- for simplicity sake you may want to install RADIUS server on the same machine as Gluu with WWPass;
- configure /etc/freeradius/3.0/clients.conf to allow your Cisco ASA to make requests to this RADIUSNext;
client localhost {
        ipaddr          = 127.0.0.1
        secret          = OB768a6aI5
        require_message_authenticator = no
        nastype         = other
        virtual_server  = default
}

client ASA-example-inside {
        ipaddr          = 192.168.1.10
        netmask         = 32
        secret          = s0me_$|-|@l)eD-S3(|>37
        require_message_authenticator = no
        nastype         = other
        virtual_server  = cisco-iam
}
- localhost client section is designed for internal tests purposes only. May be ommited;
- ASA-example-inside client section describes what is ASA address and its shared secret;
- the most important parameter virtual_server specifies which virtual host of RADIUS server should be used for Cisco ASA requests;
- secret parameter should be used in the future Cisco ASA RADIUS configuration.
WWPass Easy VPN deb package
WWPass Easy VPN deb package is available on demand.
Configuration instruction: https://github.com/wwpass/gluu/tree/master/vpn#gluu-configuration
NOTE: This step is necessary.
- Obtain and install wwpass-easyvpn package. For simplicity sake you may want to install this package on the same machine as Gluu with WWPass and RADIUS;
- Edit /etc/wwpass/easyvpn/easyvpn.conf file:
- in the wpass_connector_links section specify the name and location of WWPass helper application for different platforms.
If you install wwpass-easyvpn from the package (recommended) then wwpass-connector for macOS and Windows and client deb package for Linux are included. Just make sure their names are the same as specified in wwpass_connector_links. Note: %20 symbols stand for spaces in the file names and you don't need to replace spaces in file names.
Otherwise if you install wwpass-easyvpn not from the package then place these distribution files in
/opt/wwpass-easyvpn/lib/python3.9/site-packages/WWPass/easyVPN/downloadsdirectory; - in the anyconnect_links section specify the name and location of Cisco Anyconnect client application for different platforms. You may download Cisco AnyConnect client applcation from official cisco.com site: https://www.cisco.com/c/en/us/td/docs/security/vpn_client/anyconnect/anyconnect410/release/notes/release-notes-anyconnect-4-10.html#ID-1454-00000002 Place these distribution files in
/opt/wwpass-easyvpn/lib/python3.9/site-packages/WWPass/easyVPN/downloadsdirectory;
- in the wpass_connector_links section specify the name and location of WWPass helper application for different platforms.
If you install wwpass-easyvpn from the package (recommended) then wwpass-connector for macOS and Windows and client deb package for Linux are included. Just make sure their names are the same as specified in wwpass_connector_links. Note: %20 symbols stand for spaces in the file names and you don't need to replace spaces in file names.
Otherwise if you install wwpass-easyvpn not from the package then place these distribution files in
wwpass_connector_links = {
    'Windows': '/downloads/WWPass%20Connector%20for%20VPN.msi',
    'MacOS': '/downloads/WWPass%20Connector%20for%20VPN.pkg',
    'Linux': '/downloads/wwpass-easyvpn-client.deb'
}

anyconnect_links = {
    'Windows':'/downloads/anyconnect-win-4.10.02086.msi',
    'MacOS':'/downloads/anyconnect-macos-4.10.dmg',
    'Linux':'/downloads/anyconnect-linux64-4.10.tar.gz'
}
- in the «profiles» section add the new entry:
profiles = {
    'Office Network Access': {
        'handler':'anyconnect',
        'host':'asa.example.com',
        'vpngroup': 'OfficeAccess',
        'groups_allowed':'CN=VPNAllow,OU=Security,OU=Groups,OU=Office,DC=example,DC=com',
        'check_url':'https://probe.example.com/probe/probe-officeaccess.html',
        },
}
-
1st string – friendly name of VPN profile. It will appear in the dropdown menu of VPN WEB portal.
-
2nd string – handler type. For Cisco Anyconnect it is anyconnect.
-
3rd string – Cisco ASA hostname. Usually it is FQDN of ASA as in the certificate of Cisco ASA.
-
4th string – name of the VPN profile of Cisco VPN. Note: name of the profile is case sensitive.
-
5th string – group name which members are able to use this VPN profile. Since we may have multiple VPN profiles in Cisco ASA for different purposes, we need to be able to segregate the access.
-
6th string – url to check VPN access. This could be just an empty file which is accessed ONLY from VPN addresses.
-
Two important configuration files appear after wwpass-easyvpn package installation:
/etc/freeradius/3.0/mods-available/wwpass-checknonce;
/etc/freeradius/3.0/sites-available/wwpass-vpn;
- Enable module and virtual host. To accomplish that execute following commands:
cd /etc/freeradius/3.0/mods-enabled && ln -s ../mods-available/wwpass-checknonce
cd /etc/freeradius/3.0/sites-enabled && ln -s ../sites-available/wwpass-vpn
systemctl restart freeradius
Cisco ASA 5505 and newer
Create AAA Server Group and add RADIUS server in it
- Navigate to the Configuration → Remote Access VPN → «AAA/Local Users → AAA Server Groups menu tree;
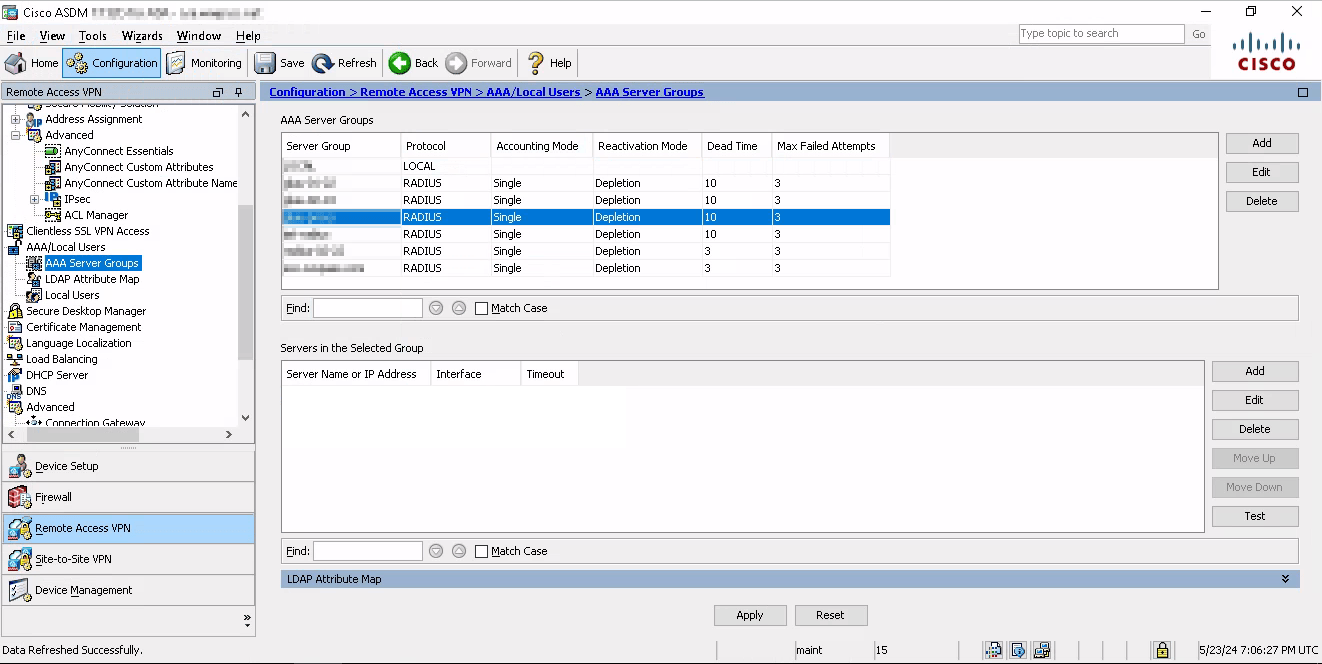
- Click Add;
- In the new window provide the name of Server Group, e.g. gluu-proxy;
- Make sure Protocol feild is RADIUS;
- Everything else leaves intact;
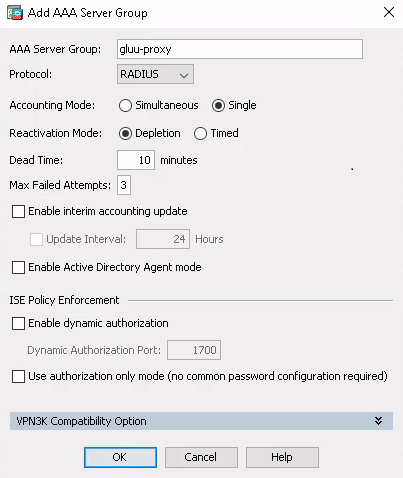
- Click OK to apply settings;
- Add the new RADIUS server in the newly created Server Group:
- Select newly created group gluu-proxy;
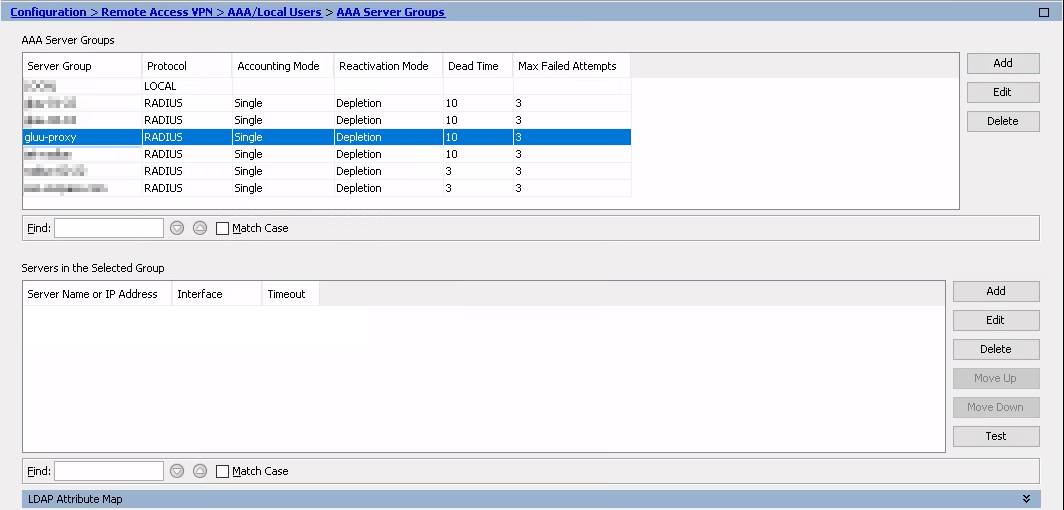
- Click Add button in the Servers in the Selected Group;
- Select newly created group gluu-proxy;
- In the new window select Interface Name which will interract with the RADIUS server. Specify Server Name or IP Address of the RADIUS server;
- Specify Server Authentication and Accounting Ports;
- Specify Server Secret Key you use in the RADIUS server;
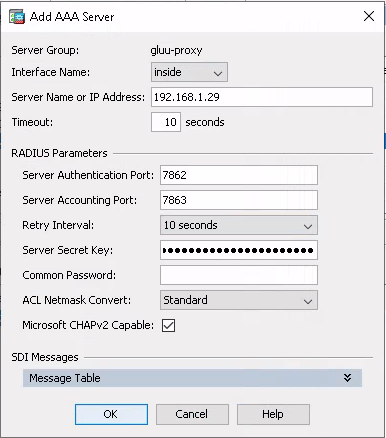
- Click OK to apply settings.
Create AnyConnect Connect profiles and group policy
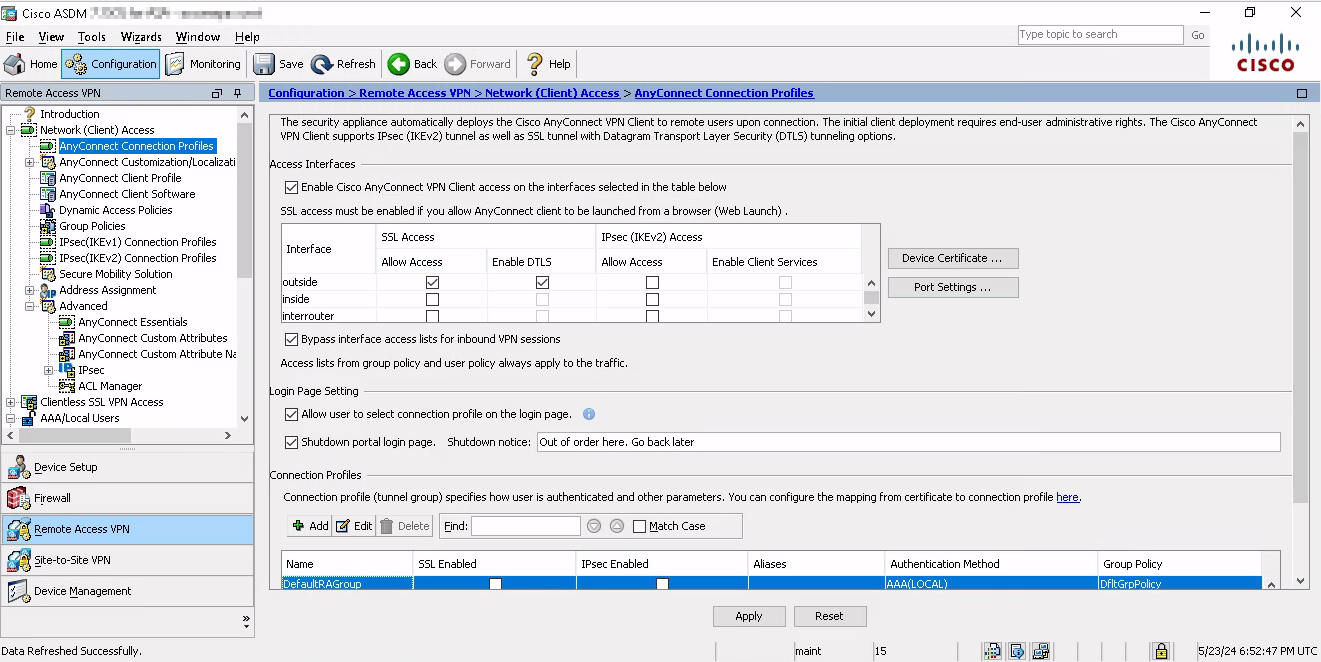
- Navigate to the Configuration → Remote Access VPN → Network (Client) Access → AnyConnect Connection Profiles menu tree;
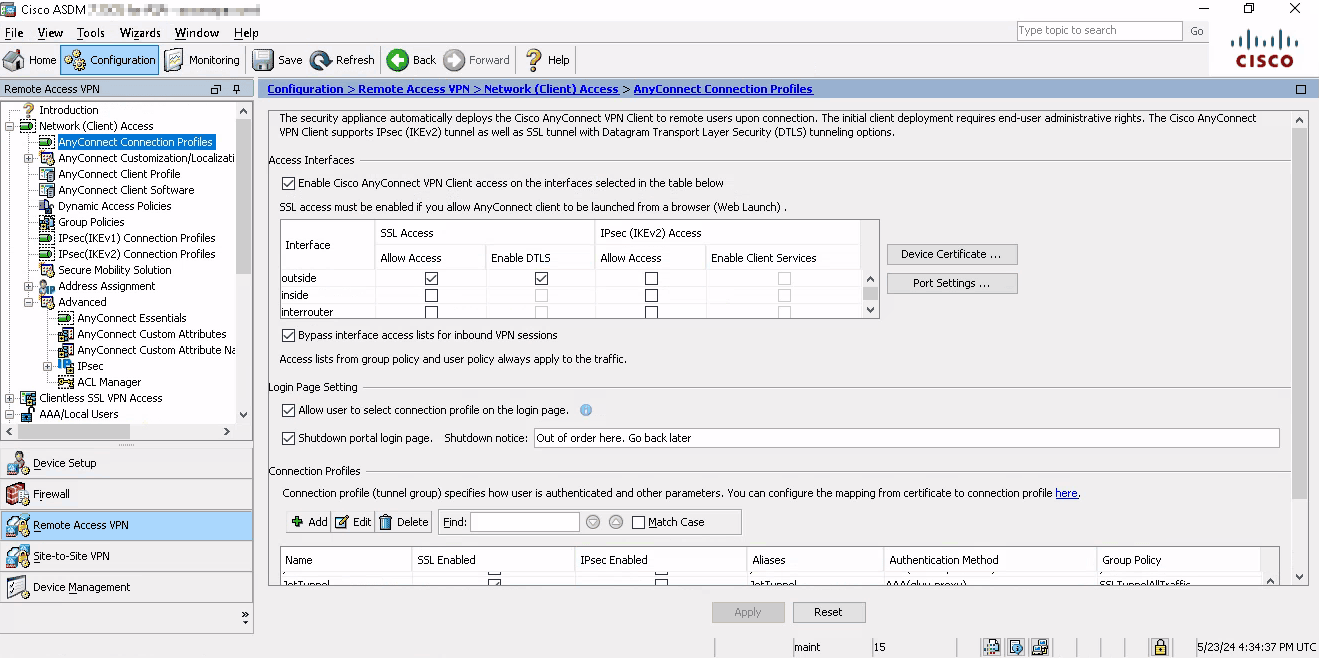
- Set checkbox Enable Cisco AnyConnect VPN Client... in the Access interface window;
- Set checkboxes Allow Access and Enable DTLS for specific interface you want to accept the VPN connections;
- Make sure Port Settings are correct for your environment (default is 443 both for HTTPS and DTLS);

- IMPORTANT: make sure you have checked checkbox Allow user to select connection profile on the login page;
- You may want to disable VPN WEB portal by selecting Shutdown portal login page. Specify the reason and notice in the corresponding field. In that case clients will see the following page when they try to access WEB portal of VPN server:

- Click Add button in the Connection Profiles field;
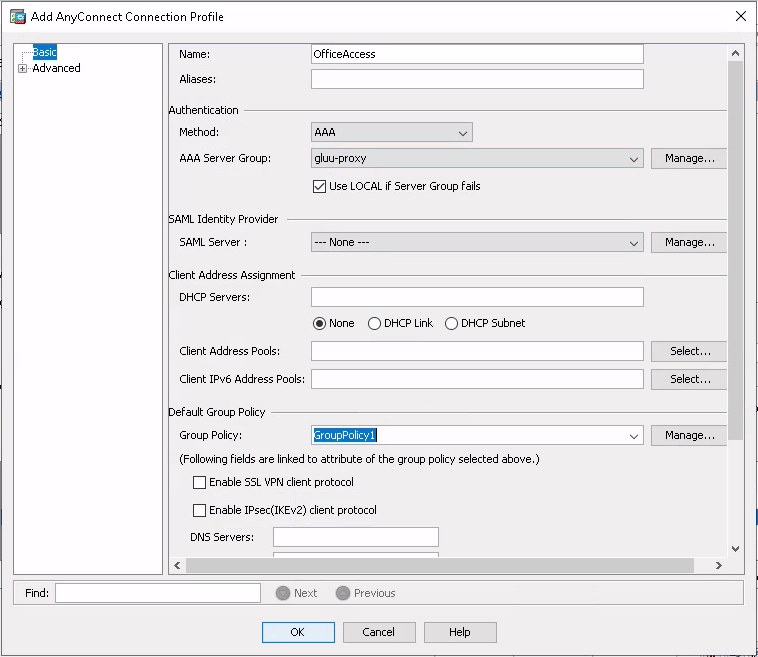
- Specify Connection Profile name according to its purpose, e.g. OfficeAccess. It must match the wwpass-easyvpn profile name vpngroup parameter. NOTE: Connection Profile name is case sensitive.
- Select a method AAA and AAA Server Group – gluu-proxy under Authentication field;
- Check Use LOCAL if Server Group fails checkbox;
- Specify Client Address Pools – the IP addresses which will be assigned to the VPN clients;
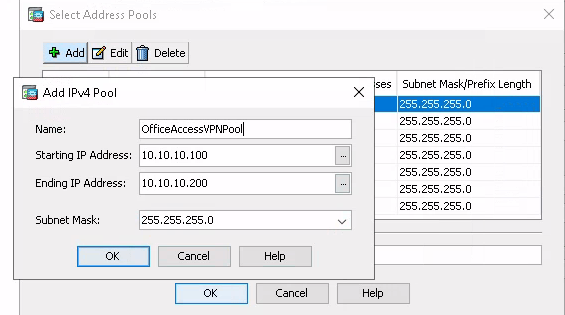
- To create a new Client Address Pool click Select button and then click Add button;
- Specify Pool Name, its starting and ending address and Subnet Mask;
- Click Manage button under Default Group Policy field and then Add button to create a new Group Policy;
- New windows appears:
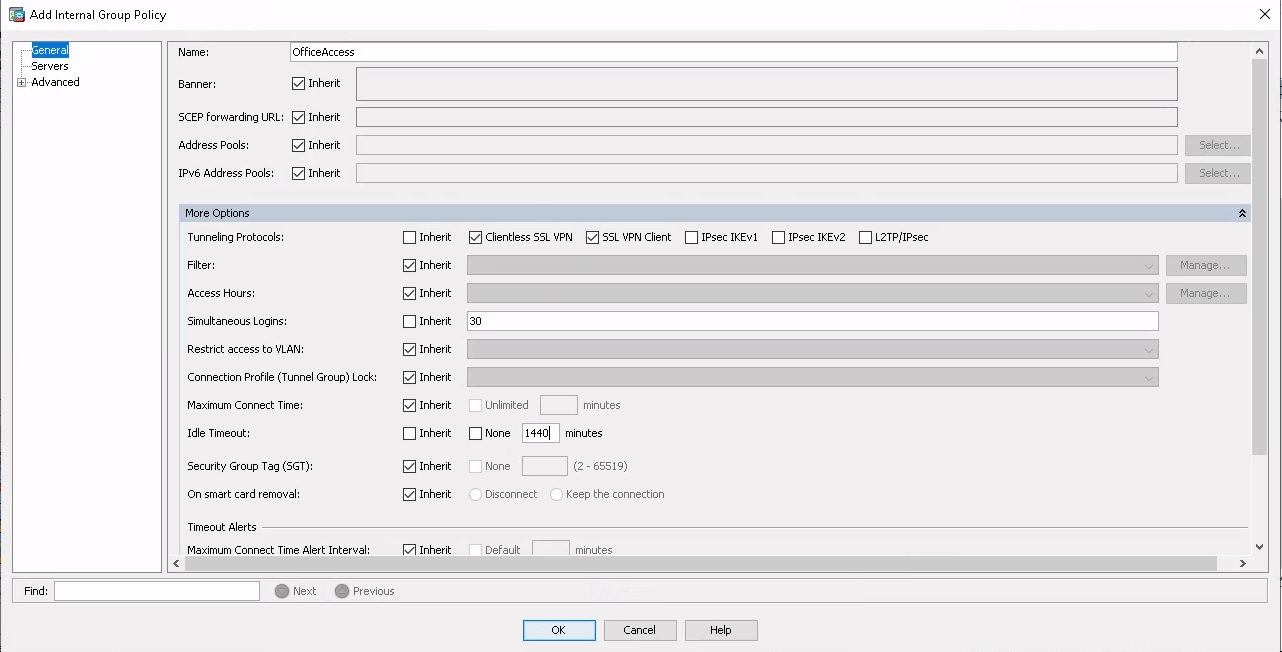
- Specify the name of group policy. Usually it is the same as the Connection Profile name;
- Uncheck Inherit checkbox next to Tunneling Protocols and check Clientless SSL VPN and SSL VPN Client;
- Uncheck Inherit checkbox next to Simultaneous Logins and specify the number of the simultaneous logins you prefer;
- You may want to uncheck Inherit checkbox next to Idle Timeout and specify the nubmer of minutes after which the idle connection will be dropped;
- Specify DNS servers for this VPN group policy in the Server menu tree;
- Navigate to the Advanced → Split Tunneling menu tree;
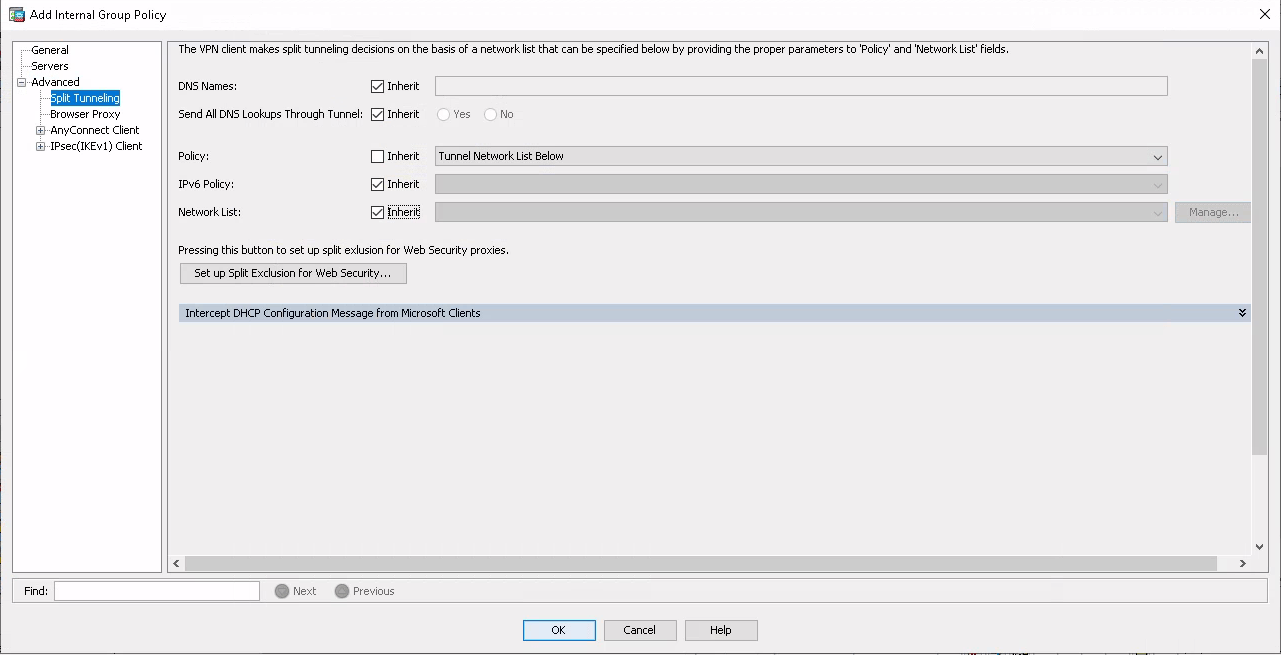
- Uncheck Inherit checkbox next to Policy: field and select Tunnel Network List Below;
- Uncheck Inherit checkbox next to Network List: field and click Manage: button;
- ACL Manager windows appeares;
- Click Add button and select Add ACL... menu;
- Specify ACL name, e.g. OfficeNetwork;
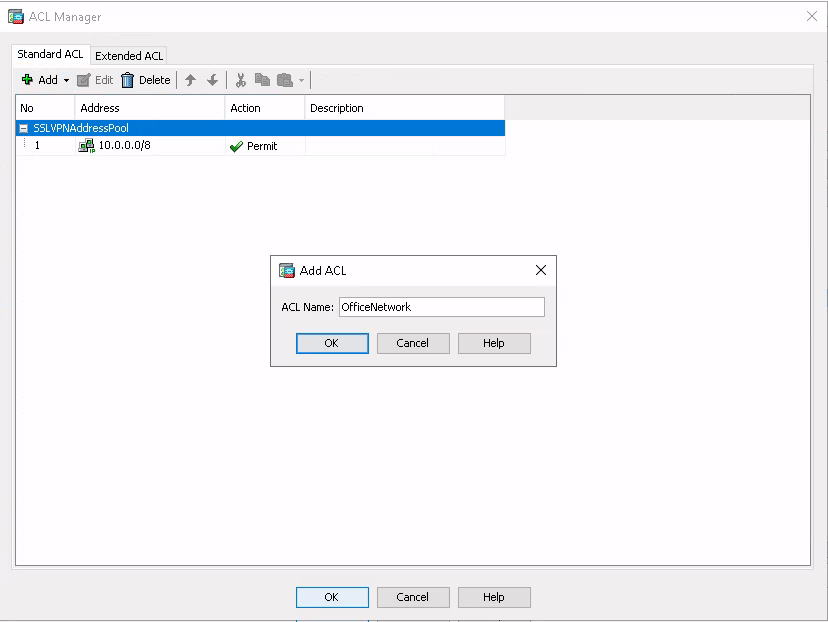
- Click OK button;
- Select newley creates ACL, click Add button and then select Add ACE... menu;
- Specify the office network subnet address;
- Click OK button;

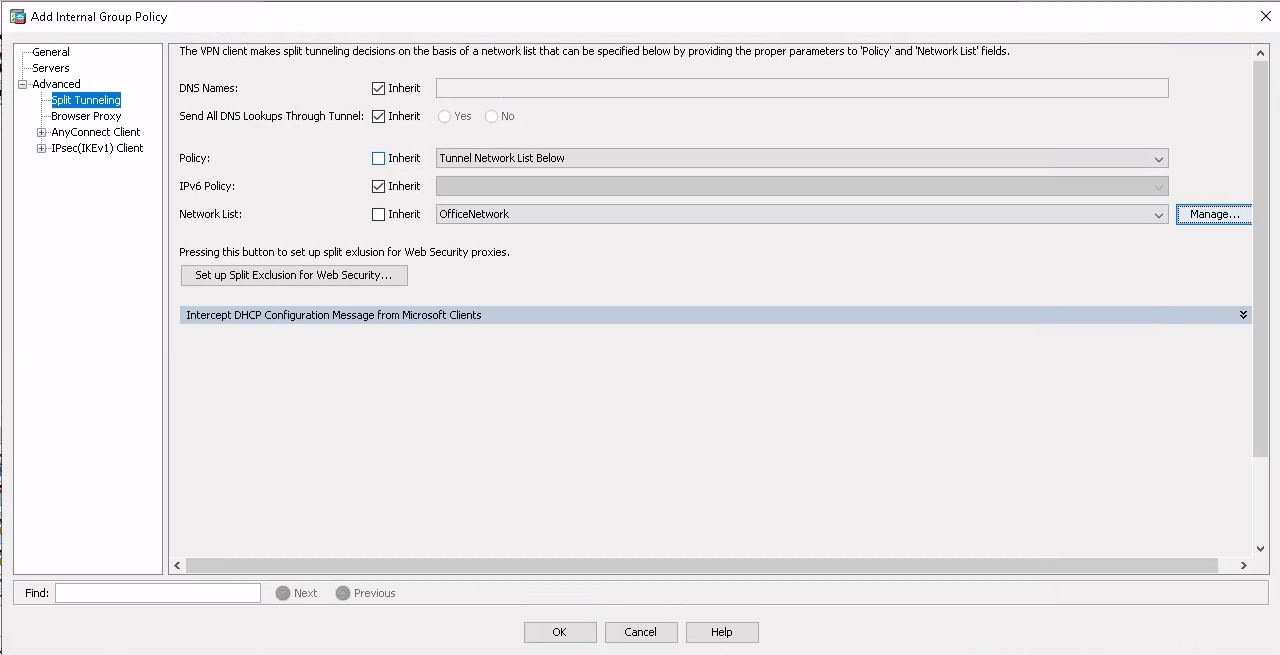
- Click OK button;
- You returned to the AnyConnect Connection Profiles menu;
- Navigate to the Configuration → Remote Access VPN → Network (Client) Access → AnyConnect Client Software menu tree;
- Click Add button;
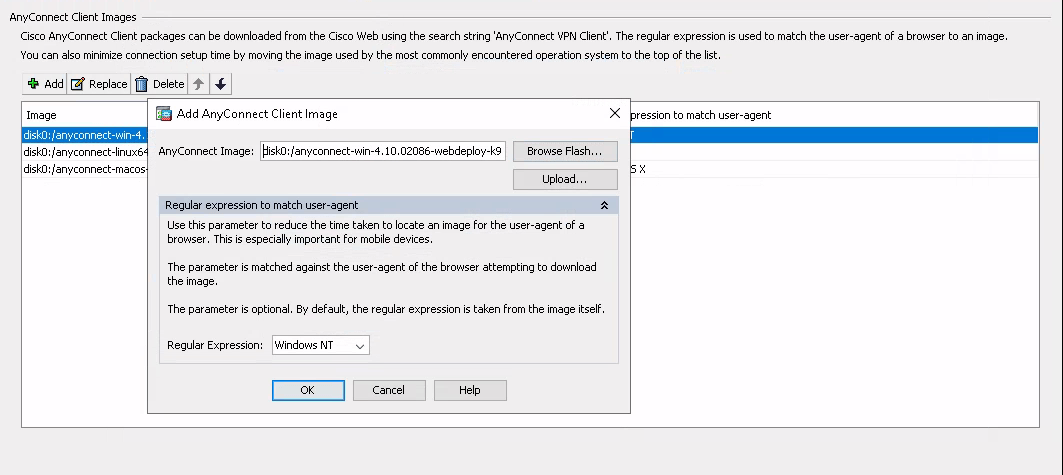
- Browse flash of Cisco ASA storage or upload a software to flash storage to select correct *.pkg file. For Windows its name is anyconnect-win-4.10.02086-webdeploy-k9.pkg; Note: always use Anyconnect Client version 4.10 and above. Older versions are not supported.
- Click OK button;
- Click Apply button to apply all changes.
WWPass VPN client side
-
Assuming you have already done the WWPass PassKey binding with Gluu IAM account.
-
Go to VPN WEB portal https://connect.example.com
-
Authenticate with QR code;
-
In the following window click on the corresponding link to download WWPass connector application for the corresponding operating system;
-
Clik on the corresponding link to download AnyConnect VPN client for the corresponding operating system;
-
Install downloaded applications. Restart computer if required.
-
This is the one time operation. You don’t need to perfom it every time.
-
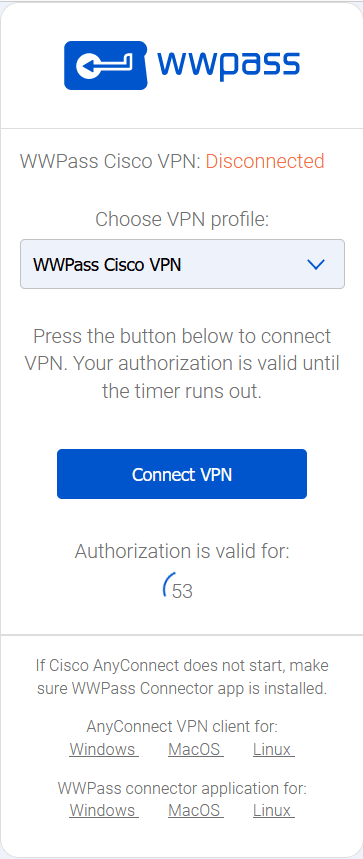
Reload the page.
-
In the dropdown meny select appropriate VPN profile (if there are multiple).
-
Click Connect VPN button. Cisco AnyConnect VPN will run automatically and selected VPN will be connected.